Tag Archives: crown molding

Crown Molding and Medallions

Welcome back to Part of 3 of our series on decorating your ceiling.  In this post we will talk about updating your décor with crown molding, but with a twist on design.  Furthermore, we will show you a great way to add a finished look in an unexpected way.

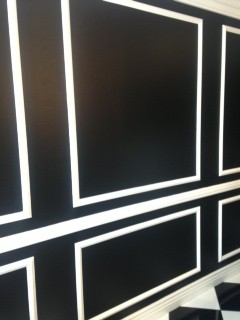
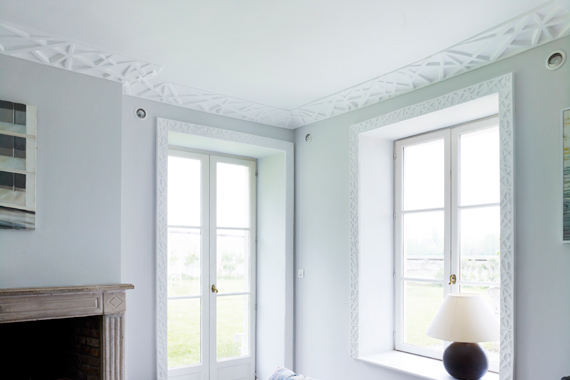
Around since ancient Greece, the use of crown molding and ceiling molding are a tried and true method for adding a strong visual effect to any room.  Crown molding can transform the look of a room in an instant and at an affordable price.  There are a wide range of moldings available including premade and unique custom designed moldings in a variety of materials.  Typical styles at-market range from Craftsman, Revival, Colonial, Federal, Greek Revival, Early American, and Georgian, each adding its own personality to the room.  A slight beading can make a room more feminine, while clean lines on Greek Revival can make a room appear polished and crisp.  There are endless images on-line to see what style you feel is the perfect match for your space.  We’ve included some images of unique crown molding below to tempt the inner designer in you.  Notice how in image #3 the archway is in the traditional Federal style, and the ceiling is in an exclusive custom design.  Mixing the styles adds interest and drama, which all girls love!

Unique Crown 1 Unique Crown 2 Unique Crown 3

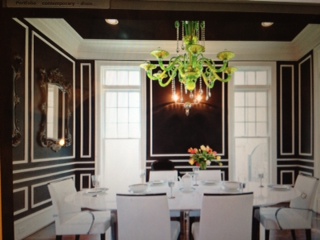
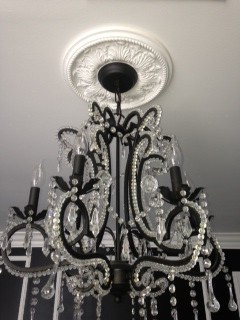
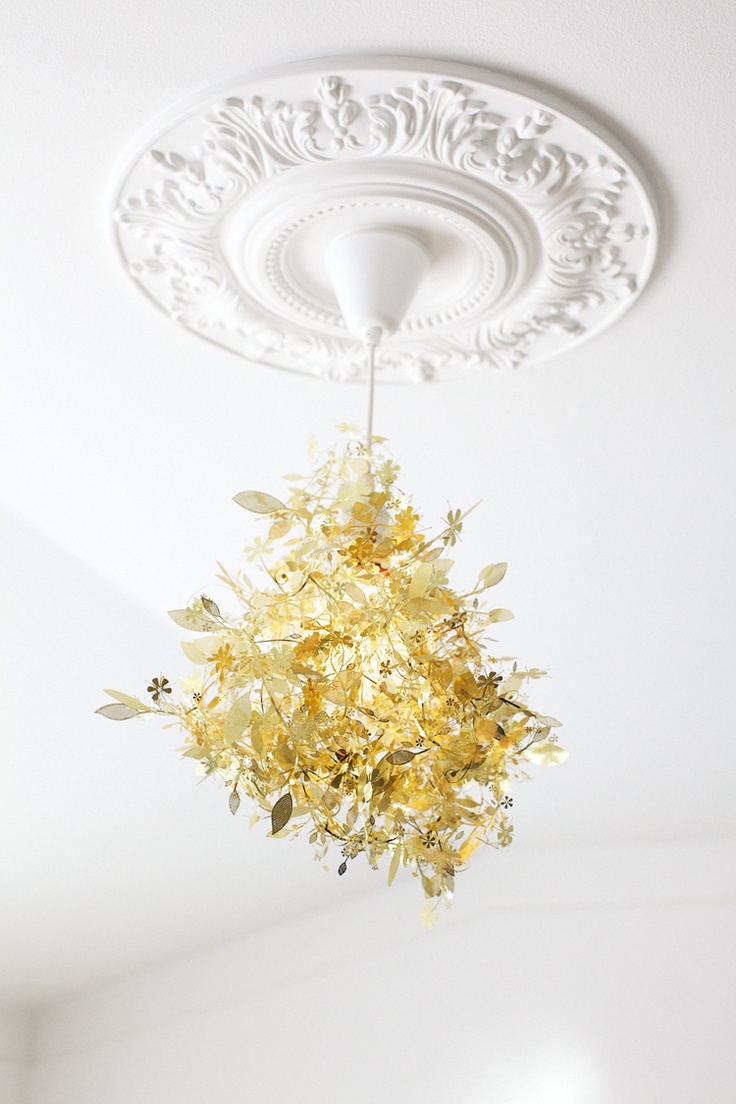
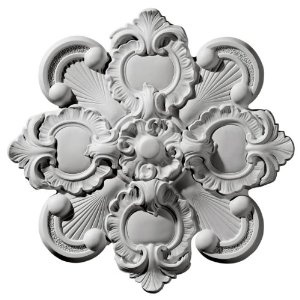
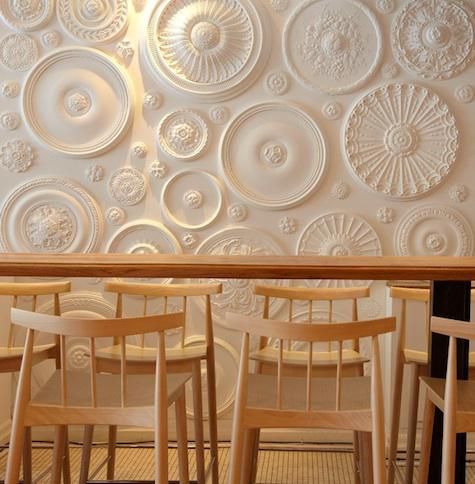
For an extra special touch to your ceiling the Jigsaw Designers like using circular ceiling molding called a ceiling medallion.  The medallions look fantastic around light fixtures and chandeliers for an unexpected touch.  The molding easily completes the look and gives the room a custom finish.  See the images below from a recent Jigsaw install with an elegant pattern around a crystal chandelier.  This look can work well in a home or office and we especially love it in modern, classic and Hollywood glam homes.  It’s a lovely element of surprise in a bathroom or kitchen where in times past it would only be found in a formal dining room.

chand 2

Ceiling medallions are readily available in the marketplace and can be found on-line.  A few of our favorite vendors are architecturaldepot.com and classicceilings.com, because we’ve found the quality to be nice and made of good materials and not plastic.  Prices range generally from $12-$55 and can go upwards from there.  Ceiling medallions can all be used on walls too…but we’ll save that for another post. 

Ceiling Medallion 1

Ceiling Medallion 2

Ceiling Medallion on Wall

Crown molding and ceiling medallions are a sure way to lighten and brighten a room.  The Jigsaw team does recommend using a contractor for crown molding, but if you are handy with a saw then you can probably handle the job.  Take your ceiling to new heights with this easy update! 

For more information on crown molding and resources visit the contact page on the Jigsaw Design Group website at www.jigsawdesigngroup.com.  Someone will quickly contact you with more information.  Please subscribe to the blog for more informative articles like these, and check out our Facebook page for more tips and images!  Be sure to ‘like us’ on Facebook!

Une Touche d’ Elégance

You have everything perfectly decorated in your space.  You take a step back to admire your decorating skills, and you think…something is missing!  After you peruse the images below, you will find the answer and know that it’s simple and understated, but it speaks volumes of l’elegance…molding!  With a few easy steps and some inexpensive chair railing you can transform you bedroom to a decadent boudoir, a dining room into a social retreat, or your living room into an elegant lounge.  At Jigsaw, we love adding chair railing to any room to maximize impact.  It’s fun, it’s sexy and it’s easy…and we are going to show you how!

Here are the steps:

  1. Select the width and style of railing you’d like to use for your project.  Railing can be found at Home Depot, Lowe’s or most lumber yards.
  2. Measure the size box you want, and the height of the chair rail (if desired).
  3. Use a yardstick to draw the box directly on the wall.  If you plan to use one color paint on the wall, the Jigsaw Designers recommend painting the full wall first, and then draw your railing.
  4. Cut the railing with the measurements using an angle saw.  Railing can be cut at Home Depot, Lowe’s or any lumber yard you choose if you don’t have an angle saw.
  5. Paint the railing the desired color.
  6. Nail the railing into the wall in the center of the railing.  Fill in the corner cracks and nail holes with putty if necessary and then touch up paint.

These are the simple steps to follow.  After that you can get as creative as you dare with painting.  Below you will see how the Jigsaw team transformed a dull drab office into a glamorous and exciting place to work.  First they painted the entire wall black, and then added the white chair railing.  The overall look is classic and stunning.

Depth and dimension can be added to the room using monochromatic colors on the wall as well.  For example a darker grey paint below the railing and a lighter grey above the railing can add interest without being too busy.  Tone on tone can also be a very chic way to add railing in an understated fashion.  While the Jigsaw Designers recommend using a professional for crown molding around the ceiling, they are however confident that anyone can complete this project with great results.  We hope you are inspired to add drama and elegance to your space by following these simple steps for your railing project.

Before and After Photos:

Before Mold 2

molding 3before 3Office 1Mold Dining roomMolding bedmolding fabric


For more information on wall moldings and resources visit the contact page on the Jigsaw Design Group website at www.jigsawdesigngroup.com.  Someone will quickly contact you with more information.  Please subscribe to the blog for more informative articles like these, and check out our Facebook page for more tips and images!  Be sure to ‘like us’ on Facebook!